Glass Thickness Measurement Principle | Glass Thickness Gauge
Because of the different types and shapes of glass in life, our method of thickness measurement is different for different types of glass. The most common ones are uninstalled flat glass, curved glass, single-layer glass, multi-layer insulating glass, laminated glass. So how do you measure the glass thickness? What is the principle of different glass thickness gauges? Let's take a look at it below.
1. Simple tool measurement
The most common method of measuring glass thickness in life is to use vernier calipers, micrometers, zero-scale extensions, etc. The advantage of this measurement method is that the measurement data is accurate and intuitive. The disadvantage is that this measurement method must be in contact with both sides of the glass in order to achieve data measurement. For already installed glass, glass curtain wall, insulating glass, laminated glass, etc., the thickness cannot be accurately measured.
2. Optical measurement method
Most of this measurement method is based on the principle of optical triangulation. It is simply an optical measurement method based on the collinear equation and using the triangular relationship between the object, the light source and the camera to directly perform the geometric solution. This measurement method usually uses an optical path. There are mainly the following defects:
Different types of glass may cause uneven thickness or uneven surface due to processing and other various reasons, which may cause relatively large deviations in the direction of the emitted light, thus affecting the measurement accuracy.
The installed hollow glass due to changes in light, temperature, pressure, etc., the interior of the glass will change, resulting in a change in the entire thickness. Different angles appear at different locations of the glass, resulting in errors in the thickness of the hollow.
3. Light refraction + Fresnel formula calculation method (high precision glass thickness measurement principle)
This measurement principle of the glass thickness gauge is based on the optical triangulation thickness measurement principle, combined with adaptive calibration method, sub-pixel detection technology, dual optical path and other methods to comprehensively determine the thickness of the glass. The measurement accuracy of this technology is stable. This test method is also the most widely used method for high precision glass thickness gauges.
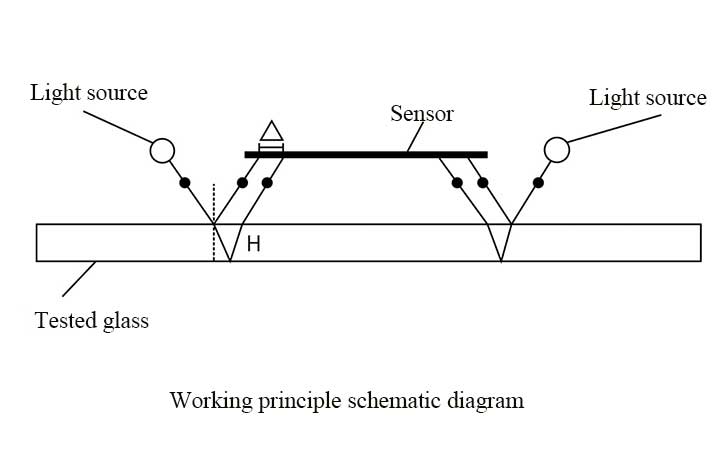
This measurement principle is simply two light sources located in a photodiode line sensor that emit a beam of light. After being refracted and reflected, a reflected spot is formed on the receiving surface of the sensor. There is a certain correspondence between the position of the spot and the tested glass. After calibration, the thickness of each layer can be calculated. Calculating the two optical path values can reduce the measurement error.

The formula for calculating the thickness H of the glass:
H=△/(2tan[〖sin〗^(-1)=((sin i)/n)])
i = optical path incident angle
n=refractive index
△ = two reflective light plate spacing on the sensor receiving surface